Friday, 20 May 2016

How To Remove Virus From USB Or Any Drive On Windows 10 Using CMD


Remove Virus from USB Or Any Drive on Windows 10 Using CMDMost of the viruses modify the attributes of a file or a folder such that they become very hard to access. Some of the attributes that are changed in a file or a folder are the read, write or the execute permission on that file. Using ‘attrib’, one of the cmd commands, we can try our hands to change the attributes of a file and reset the file’s internal structure in order to recover a file.
How is a virus different from any other file on Windows? A virus can be present in your system as a file format which has the following properties:
  • A virus can be a file hidden from a user
  • A virus can be present in the form of an ‘autorun’ or ‘Autoexec’ file
  • A virus can be an exec file
  • A virus can be a file with different attribute permissions
Some of the well-known examples of the above kinds of the viruses are:
  • Autorun.inf
  • Ravmon.exe
  • New Folder.exe
  • svchost.exe
  • Heap41a

Remove Virus Using CMD from USB/ any Drive on Windows 10:

In order to remove a virus using cmd, we will use a famous cmd command called ‘attrib‘ command.
It can be easily guessed from its name that the ‘attrib’command represents different attributes of a file, folder or a directory. This command is mainly responsible for displaying, setting and removing the different attributes like read-only, archive, system, and hidden attributes of a file or folder.
Using this command, we will try to change the attributes assigned to a file and thus recover our file.
Here are the basic attributes of the ‘attrib’ command which we will use later:
  • R – R represents the “Read-only” attribute of a file or folder. Read-only means the file cannot be written or executed.
  • H – H stands for the “Hidden” attribute.
  • A – Similarily,  A stands for “Archiving” which prepares a file for archiving and,
  • S – S attribute changes the selected files or folders into a system file from a user file by assigning the “System” attribute to that particular file.

“attrib” Syntax:

ATTRIB [+ attribute | – attribute] [pathname] [/S [/D]]
In the above command, let’s see what the different parameters and switches are:
‘+ / –’ : To enact or to cancel the specified attribute.
‘attribute’ : As explained above
/S‘ : Searching throughout the entire path including subfolders
‘/D’ :  Include any process folder
‘pathname’ : Path where the target file or folder is located.
Here is the proper syntax for attrib command:
ATTRIB [+R | -R] [+A | -A ] [+S | -S] [+H | -H] [+I | -I] [drive:][path][filename] [/S [/D] [/L]]
Let’s get started:
I am going to transfer an ‘autorun.inf‘ virus from my USB drive to my D: drive and delete that virus from my D: drive.
  • Run command prompt as an administrator
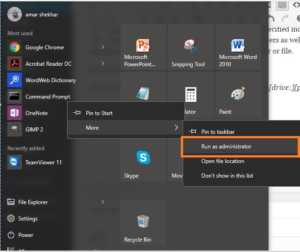
command prompt run as administrator
  • Since the autorun.inf virus is in my D: drive, I am going to change the drive to D: drive. It can be done by typing D: and press enter.
Change drive in cmd
  • type attrib and press enter. This command will list out all the files inside the current drive and you can clearly see the autorun.info virus listed below.
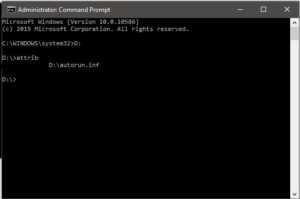
autorun.inf in D drive
  • To remove Virus using CMD, type into your command prompt attrib -r -a -s -h *.* and press Enter. This will remove the Read Only, Archive, System and hidden file attribute from all the files.
    • -r is for removing the read-only files
    • -a is for removing the archive file
    • -s is for removing the system file
    • -h is for removing the hidden file
    • *.* for all the files with all different types of file extensions
attrib command to remove virus using cmd
  • Note that this command will only remove the different attributes from different files. However, the files will still be there. Now time has come to delete the virus. So, to delete the virus, type del autorun.infand enter
delete virus using command prompt cmd
  • Once you have pressed enter, that file should get deleted from the current drive. In case, you want to delete that file from a USB stick, then you can change your current drive to USB drive current drive in step 2 and follow the commands.
  • You can again type ‘attrib’ command to see if the deleted file exists or not. As seen above, it does not exist anymore in the D drive.
  • To remove other viruses with extensions such as ‘.ink’, ‘.exe’, just type Del *.ink or Del *.exe respectively to delete those suspicious files.
I hope this would have been informative for you. If you know some other tricks, let us know in the comments below.

Thursday, 19 May 2016

How To Get Faster Internet Connection Speed – The Complete Guide


Get Faster Internet Connection SpeedShort Bytes: To get a faster internet connection speed, one can practice different methods and hacks. These methods to accelerate your internet speed can include many different fixes such as software tweaks, hardware tricks or some basic security fixes. Also, the problem of a slow internet can be due to the issues with your DNS settings, your Wi-Fi placement, wrong selection of Wi-Fi channel or some security reason. So, I will try to resolve each and every problem one by one and tell you about the tweaks to improve your internet speed and get an amazing browsing experience.
We often receive comments from our visitors saying “My internet speed is so slow, what to do?”, “Why my Internet is slow in Windows”,”Why my Internet is slow in my Mac/ Linux system?”, “I’m getting very slow internet speed even after purchasing a good plan!”, “Any shortcut to increase the internet connection speed?” and more. We try to reply to almost everyone, but, sometimes, it’s hard to understand the problem as it could be any one of the above-mentioned reasons.
To be very honest, there isn’t a single way to avoid the slow connection. So, in this in-depth tutorial, I’m going to tell you almost every single possible way to check and increase your internet connection speed. And, this article should be able to provide solutions like making the Wi-Fi speed faster and increasing the internet connection speed.

Software fixes for increasing internet speed:

  • Take your internet speed test

The very first step that we are going to do here is to take the internet speed test and ping test. I think most of you have already heard about the world’s best internet speed test by Ookla i.e. speedtest.net. The company recentlydropped Adobe Flash and launched another internet speed test written in HTML5.
Take the old Ookla’s internet Speedtest here and Ookla’s HTML 5 Speedtest here. Using Ookla’s Speedtest to test your speed is very simple. All you need to do is visit the Speedtest.net website and click on the BEGIN TEST button.
Take the Ookla’s Pingtest here.
ookla speedtest
  • Make sure your browser and OS is updated

An old and updated browser/OS also hinders your internet speed and thus makes you stuck in the middle of web browsing, downloading/uploading files etc. Make sure that your browser, as well as Operating System, is up to date in order to get a better speed. If you are finding it hard to update your browser, you can download the latest version alternatively:
  1. Download the latest version of Mozilla Firefox here.
  2. Download the latest version of Google Chrome here.
  3. Download the latest version of Safari here.
  4. Download the latest version of Internet Explorer here.
  5. Download the latest version of Edge browser here.’
To update your operating system, you are advised to find the suitable update settings in your computer and move to the latest version of OS.
  • Check for background activities

Background activities are the number one contender when it comes to slowing down your internet speed. To ensure a better internet speed, you need to check and kill those unnecessary background activities which are on your system.
Windows users can check the background activities by pressingCTR+Shift+ESC, whereas Mac users can search for “Activity Monitor” in Spotlight search.
Similar commands can also be used for Linux systems. For example, you can go ahead and use gnome-system-monitor command to fire up the system monitor app on your Ubuntu PC.
These background activities also involve system updates. It might be possible that you are experiencing slow internet speed temporarily. So, as soon as the update is completed, your internet speed will come back to normal. Although, you can always turn off the system update but that would not be recommended.
  • Browser tweaks for faster internet surfing

Users can also enhance their internet surfing experience by doing some tweaks in the browsers. Make sure to clear your cache and other junks regularly as sometimes they are the major cause of slowing down your browsing speed.
I’ve already written few article on how to make Mozilla Firefox and Google Chrome faster for web browsing. I will also be writing something on Edge and Safari for faster browsing in future. Meanwhile, if you are a Google Chrome user, you can always read my article on how to stop Chrome from killing your computer and reduce the RAM usage.
  • DNS hack for speeding up the internet

If you are a regular visitor of fossBytes, you might have come across my article on DNS Hack for faster internet. You can choose either Google DNSor OpenDNS according to your need. Generally, Google DNS is recommended for faster and secure internet.
For Google DNS configuration, use these IP addresses:
  • For IPv4: 8.8.8.8 and/or 8.8.4.4.
  • For IPv6: 2001:4860:4860::8888 and/or 2001:4860:4860::8844
For Open DNS configuration, use these IP addresses:
  • For IPv4:
    • Preferred DNS server: 208.67.222.222
    • Alternate DNS server: 208.67.220.220
  • For IPv6:
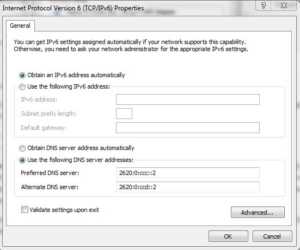
    • Preferred DNS server: 2620:0:ccc::2
    • Alternate DNS server: 2620:0:ccd::2
DNS-hack-faster-browsing
  • Stop torrent downloading and uploading

This is no hidden fact that torrent downloading/uploading also sucks your internet speed big time. And the worst part is, most of the time, you are unaware of this because these applications run in the background and start automatically whenever you turn on your computer.
So, if you are having trouble getting a good internet speed, check and make sure that your torrents are paused. You can also uncheck the “Start xyzTorrent on system startup” while installing the software.
  • Free up the unnecessary used space

Although, I won’t exactly call it a method but there is no harm in cleaning up the unnecessary used space in your old PC. The programs that are installed on your PC and need internet to operate, hinder your speed even if you aren’t using them. So, you should uninstall the programs that are of no more use to you. Also, do not forget to delete temporary internet datacreated by these programs.
  • Scan and remove adware

Adware are a curse to your PC as well as the internet. I’ve explained the adverse effect of adware, how to scan and remove them in the security fixes section that’ll be discussed further.

Hardware fixes for faster internet

  • Find problem with your Wi-Fi

It’s not that only your software slows down your internet speed, your hardware can affect that too. Previously, we wrote about Ofcom Wi-Fi checker app that runs on your smartphone or tablet and checks the quality of your WiFi signal. So, my advice to you is to download and install Ofcom or any similar Wi-Fi checker app to detect the problem and improve your Wi-Fi connection.
Read the following points to know small fixes to improve your internet speed.
  • Wi-Fi router placement to get good connection

Wi-Fi router placement plays an important role when it comes to boosting your Wi-Fi signal strength and hence getting better internet speed. According to a research, your router should be placed at the central location and at some elevation. Keep your router away from Microwave and direct your antenna upwards for better horizontal reach and sideways for better vertical reach.
If you want to know how you can enhance Wi-Fi signal by choosing a right place in detail, read our dedicated article on the same topic here. This post contains some important points based on physics.
  • Choose the correct Wi-Fi channel

Channel overlapping also obstructs the Wi-Fi signal and tones down your internet speed. Choosing the correct Wi-Fi channel reduces the interface and improves your Wi-Fi signal. The overlapping is done mostly with nearby channels, so, choosing channel 1,6 and 11 is the best option as they are spaced far enough and do not overlap (as shown in pic).
If you are willing to know more about choosing the correct channel to get a better Wi-Fi speed, read our in-depth article here.
wifi-channel
  • Boost your Wi-Fi with beer can

To some, this method might seem funny, but it actually works. Cut and place the beer can over the antenna in such a way that your devices are facing the concave and shine side of the beer can. As a result, the Aluminium can will reflect the signal — that was earlier getting wasted in other directions — towards you and give you a strong Wi-Fi signal.
But this method has its own limitations as one side would get blocked. So, you would have to adjust it every time. If you are willing to know more about this method visit this link.
  • Best practices to increase your Wi-fi speed

It’s not that only little hacks work while talking about getting faster internet speed. One should follow these best practices to get a better and faster internet speed:
  1. Check and update your router’s firmware.
  2. Take ping test at PingTest.net regularly (Different from the usual speed test).
  3. Password protect your internet router.
  4. Disconnect old devices.
  5. Check for the signal interference from devices like cordless phones, microwaves, baby monitors etc.
  • Use repeater to strengthen signal

If you are using a Wi-Fi router in a large house and your router isn’t strong enough, you might face the problem of slow Wi-Fi signal.  It’s generally advised to use a repeater for extending your Wi-Fi network. You can either use an old router and use it as a repeater, or use a new repeater for bridging the existing router.
  • Use Ethernet over Wi-Fi if possible

Although, Wi-Fi is more convenient but we must admit that wired connections are way better than wireless ones. So, if possible, use a wired connection as it’s more secure, faster, has lower latency, and no wireless interference problems.
But again, it’s up to you to choose which type of connection you want. We have already told you about the speed test and the ping test in the starting of the article — take the tests and decide what kind of connection would be suitable for you. Read more about Wi-Fi vs Ethernet comparison here.
  • Speed Up Internet Using CMD

Command Prompt in Windows works at the very abstract level. Using CMD, you can directly interact with the ports, Flush DNS table and can even set your TCP receive window, one of the key factors in downloading from the internet. Besides, you can also define the way Microsoft Windows interacts with the internet (in the background, Microsoft also limits the internet connection).
Use the below command in CMD to check if ‘Receive Window Autotuning level’ is ‘Normal’:
  •  netsh interface tcp show global
This command will show you a list of TCP global parameters and if you see the result that ‘Receive Window Autotuning level’ is not ‘Normal’ then go for this command to set the receive windows to normal
  • netsh int tcp set global autotuninglevel=normal
Another command which could of help is
  • netsh interface tcp set heuristics disabled
This command will disable the heuristic algorithm by Microsoft which limits the internet speed.
Windows scaling heuristics disable to speed up internet using cmd
  • Clean up hardware, don’t let it heat up

This method does not come directly under speeding up your internet, but keeping your CPU cool is always a good thing. Overheating slows down your system and can harm your hardware. The cooling system of the computer consists of components like fans, heat sinks, vents etc. and any type of malfunctioning can cause problems. If you are looking for general fixes, here’s an article on how to prevent your computer from overheating.
If you are looking for something more specific, here’s how to monitor overheating issue in Linux and Windows 10 computers.

Security Fixes for high internet speed:

  • Scan for malware and adware and remove them

If you take a look at different surveys and reports, you’ll come to know that malware and adware risks are on the rise. To deal with these risks, you are advised to use an effective antivirus product and regularly scan your computer for malware, virus, adware, ransomware etc.
Make sure that along with your operating system, your antivirus solution is up-to-date and offers the best protection. If you are looking for some antivirus product, don’t forget to check out our list of the best antivirus software of 2016.
  • Check and protect router from hacking attacks

According to a research, most of the Wi-Fi routers are vulnerable to hacking attacks. The purpose of hacking into your Wi-Fi can be anything from stealing sensitive information to just using your Wi-Fi bandwidth for the internet. If goes undetected, this can harm you big time. So, I will advise you to check for the vulnerability in your router first and take the necessary precautions.
In the next point, I’ll be explaining more on network security that will also cover some steps to protect your router from getting hacked.
  • Set Network Security

Precaution is better than cure. Setting up network security could be a great way to avoid any unwanted intrusion. Make sure that your network devices like routers and switches are properly configured and password protected.
Below are few steps to protect your Wi-Fi router from getting hacked . You can also visit this link to read the in-depth article on the same.
  1. Turn on the firewall
  2. Enable WPA2 (Wi-Fi protected access)
  3. Change the default SSID network name.
  4. Use a strong password or passphrase maybe
  5. Disable remote administration
  6. Enable MAC filter and logging feature.
Those were all the methods that I had to share with you. Go ahead and try them out and let us know if you found any method helpful. Also, if you have some other tricks to boost the internet speed, tell us in comments below.